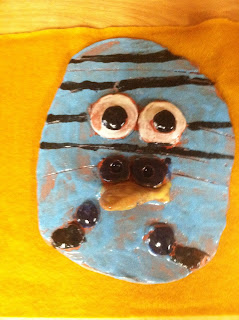
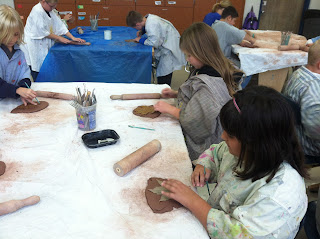
Continuing with our lesson on texture, Kindergarten has created these clay texture tiles. They each received a tile and then used different objects and clay tools to create all kinds of textures with on the tile. They were dried out, were baked in the kiln, and we then glazed them to add colors. They were baked one more time, and here they are!
Wednesday, December 12, 2012
Wednesday, December 5, 2012
2nd Grade Mixed-Up Chameleons
These cute little buggers were created by the 2nd graders. We defined a pattern, looked at patterns, even shared patterns that we've seen at home or in other places. The students then created patterns with paint markers on construction paper. We read "The Mixed-Up Chameleon" by Eric Carle. Next, step by step, we fringed the paper, drew and cut shapes, and stapled and glued these reptiles together. Our final touch was adding the tongue.
5th Grade Birch Tree Paintings
Right now we are working on some watercolor birch tree paintings. This lesson really helps us understand depth and perspective, and how to create this illusion on a flat space. First we created trees out of masking tape to keep the paper underneath the tape white. After our tape was down, we drew a horizon line. Next we mixed different values of watercolors, many of us created very light values of blue or violet for snow. Then we painted the sky and discussed placement of shadows on the ground. Soon we are going to peel the tape off, add shading to the white trees (Ms. Hatch even has some birch tree bark to pass around - she grew up in the middle of the woods), and also add details. Watercolor also really helps us learn patience- you just can't rush watercolor! More photos coming...
Wednesday, November 28, 2012
Oh, The Things Kids Say! :)
Maybe life has got you down. Maybe the holidays are hitting your stress button. Maybe you spilled your coffee. Worse, maybe you ran out of coffee. Sit back and enjoy these anonymous quotes. Life is too short not to laugh. I will update this periodically. Check out Mrs. Herman's P.E. blog for more entertainment.
"Ms. Hatch, I feel dangerous when I use duct tape"
Ms. Hatch, I feel mature when I use Sharpies"
"I'm tired of turkeys. It's turkeys, turkeys, turkeys, all day long" (around Thanksgiving time)
"My glue bottle is sick" (It was clogged up)
"Ms. Hatch, can I get you anything? A glass of water?"
"Why are minivans called mini when they are bigger than most cars?"
"This color is DELICIOUS!"
"I am a MESS." (Yes. Yes, I know how that feels)
4th Grade Clay Masks
We learn about a lot of different cultures in 4th grade art. We've been studying Native American masks from the Pacific northwest. We learned what theses were made of, how they were used, and discussed the designs we saw on them. I asked students to talk with their teammates about how masks are used in our own culture, and we made a list on the board. Our most important question for this lesson: What do masks tell us about a culture? Students then sketched their own mask design, and begin to build their mask in clay. They learned three methods for clay-building: slab, pinch, and coiling. They are still in the process, so more photos to come!
Here are some finished masks!
1st Grade Self-Portraits
First Grade are finishing up their self-portraits. We looked at all different kinds of portraits-paint, clay, drawing, collage, to understand that a self-portraits can be made out of many materials. I guided the students in drawing the accurate shapes and sizes for facial features, and we even used mirrors to help us along. They were colored with markers, and the background was created from another paper that we printed (or stamped) on with different objects. Most of the students made patterns with the printing, some created a frame around the self-portrait. Here's a few to enjoy, more will come soon!
3rd Grade Snowflake Collages
Winter is coming! Winter is coming! Where are those snowflakes? Well, if they don't come soon, it's okay because we are going to be creating them in the Art room. Third grade is learning how to identify all those color groups, like warm, cool, primary, secondary, and neutral. They are using liquid watercolors and a color group to create a painting and even adding salt to add "frost". The salt absorbs the liquid color and leaves frost-like shapes. Next, students will learn to fold and cut snowflakes, which helps us understand symmetry and radial design.The last step will be to arrange and glue the snowflakes, but we aren't quite that far yet!
Friday, November 2, 2012
Kinder Texture Rubbings
Kindergarten has been learning about texture in Art. I showed students pictures of objects and animals and asked them to tell me how that particular 'thing' would feel on their fingertips. We learned the four 'staples' of texture: Hard, Rough, Soft, and Smooth. Next, we folded a piece of paper three times, traced the fold lines, and began to create texture rubbings with texture plates and crayons. Finally, I encouraged the kinders to explore textures in the room and find objects and areas to create texture rubbings from. It was a blast!
Happy Dia de los Muertos!
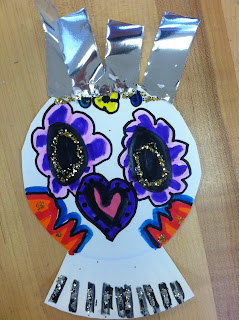
Happy Dia de los Muertos! (Day of the Dead). Art class is a great opportunity for learning about other cultures. If you're curious about all these skulls you might be seeing, these are calaveras, which is spanish for skull. We have been looking in particular at sugar skulls, which are a popular figure of Dia de los Muertos. We've been learning about this holiday and creating calaveras in different ways for the grade levels: 2nd grade painting, 3rd grade mask-making, 4th grade permanent marker drawing, and 5th grade printmaking.
Wednesday, October 24, 2012
Kindergarten Jack O' Lanterns
3rd Grade and 2nd/3rd Grade Mulit-Age Ceramic Leaf Forms
We are very excited about these Ceramic Leaves in 3rd grade! These leaves are not geometric, but organic forms made from clay. Clay is an excellent material to use because it challenges us to think about the spatial quality in art and requires a specific process to follow. We wedged our clay, rolled a slab, and traced the shape of a leaf using a real, "up-north" leaf. Next we added lines and texture and worked the clay into the form we wanted. They were put into the kiln, we glazed them (making sure to organize our colors and design), and now we are just waiting in anticipation for them to come back out of the kiln! More pictures to follow...
Subscribe to:
Comments (Atom)
.jpeg)
.jpeg)
.jpeg)
.jpeg)
.jpeg)
.jpeg)
.jpeg)
.jpeg)
.jpeg)
.jpeg)
.jpeg)
.jpeg)
.jpeg)
.jpeg)
.jpeg)
.jpeg)

.jpeg)
.jpeg)
.jpeg)
.jpeg)
.jpeg)
.jpeg)
.jpeg)
.jpeg)
.jpeg)
.jpeg)
.jpeg)
.jpeg)
.jpeg)
.jpeg)
.jpeg)
.jpeg)


